Basic Dancer2 Authentication
In this article we learn, how to add user authentication in Dancer2 App, if you are new to Dancer2, then please follow the previous tutorial.
Basic Dancer2 Authentication
In this article we learn, how to add user authentication in Dancer2 App, if you are new to Dancer2, then please follow the previous tutorial.
List out the things required for Authentication:
- Login page with get request.
- In the login page, there must be a form to submit user credentials.
- Post request (preferred) Route, where the user credentials must be validated.
- If validate, redirects the user to the landing page otherwise redirect to login page.
To start with, In the Dancer2 Project lib file. Add the following route.
get '/login' => sub {
    template 'login.tt';
};
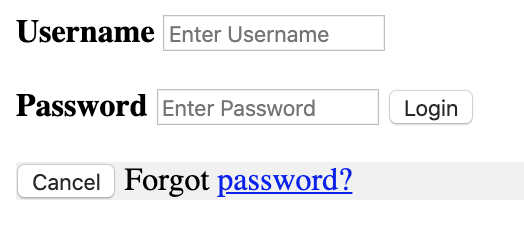
Now create a login.tt template under the views folder and add the following content.
<form action="/login" method="post">

    <div class="container">
        <label for="email"><b>Username</b></label>
        <input type="text" placeholder="Enter Username" name="email" required>
        <br><br>
        <label for="password"><b>Password</b></label>
        <input type="password" placeholder="Enter Password" name="password" required>

        <button type="submit">Login</button>

    </div>
    <br>
    <div class="container">
        <button type="button" class="cancelbtn">Cancel</button>
        <span class="password">Forgot <a href="#">password?</a></span>
    </div>

</form>
We are not using any CSS for beautification, we will cover it when we write the tutorial for the web app (In Progress).
Assuming your Dancer App is already running. Visit http://localhost:3000/login.
Please change the port number if it's other than 3000.
Now we have the form, where user enter the credentials. Next is to create a Post request route to validate the credentials.
post '/login' => sub {
    my $error;
    my $email = body_parameters->get('email');
    my $password = body_parameters->get('password');

    if ($email eq 'foo@foo.com' and $password eq '123456') {
        template 'login.tt', { message => 'User Validated. You can use any other template for successful redirection.'};
    }
    else {
        template 'login.tt', { message => 'Invalid user credentials.'};
    }
};
As of now, our landing page is same as login page. We are adding the success and failure message, so that we know if the authentication is successful or not.
Append the below lines to the login.tt template.
<br>
[% message %]
When the page is loaded for the first time. we can't see the [% message %] variable because it is not defined. From the URL, if we enter the username as foo@foo.com and password as 123456. Login page is loaded along with success message. And for any other URL, login page is loaded is failure message.
For login failure

This article only covers the basic Dancer2 Authentication. In the next article, we cover the advanced authentication using the MySQL database.
AK Newsletter
Join the newsletter to receive the latest updates in your inbox.
